Today’s post is on how my pin went viral in the first month of using Pinterest! To be honest, my account has been there for years but it was dormant with zero followers. I started using it again after I started this blog and after hearing how good Pinterest can be in driving blog traffic.
Disclaimer: This post may contain affiliate links which means that I earn if you sign-up for a service using my link at no additional cost to you. I promote only things that I’ve personally used and love.
For starters, Pinterest is a visual search engine and not a social media platform as some people might have thought (including me). You don’t really communicate with others on Pinterest do you?
I was skeptical about Pinterest at first as I had this misconception that Pinterest was only for DIY crafts, food photography, beauty products and travel. I never knew that you could use it to promote virtually almost any type of blog post. As I blog about social media, blogging and making money from home, I wanted to see if Pinterest really is a magical platform.
What is a viral pin?
There isn’t a specific number of re-pins that determines if a pin is viral. To be honest, I’m not certain if my pin could actually be classified as having gone viral.
This particular pin went viral: Promote Your Blog In These 9 Free Places To Increase Traffic While Waiting For SEO To Kick In – re-pinned 1,661 times in approximately 1 month.
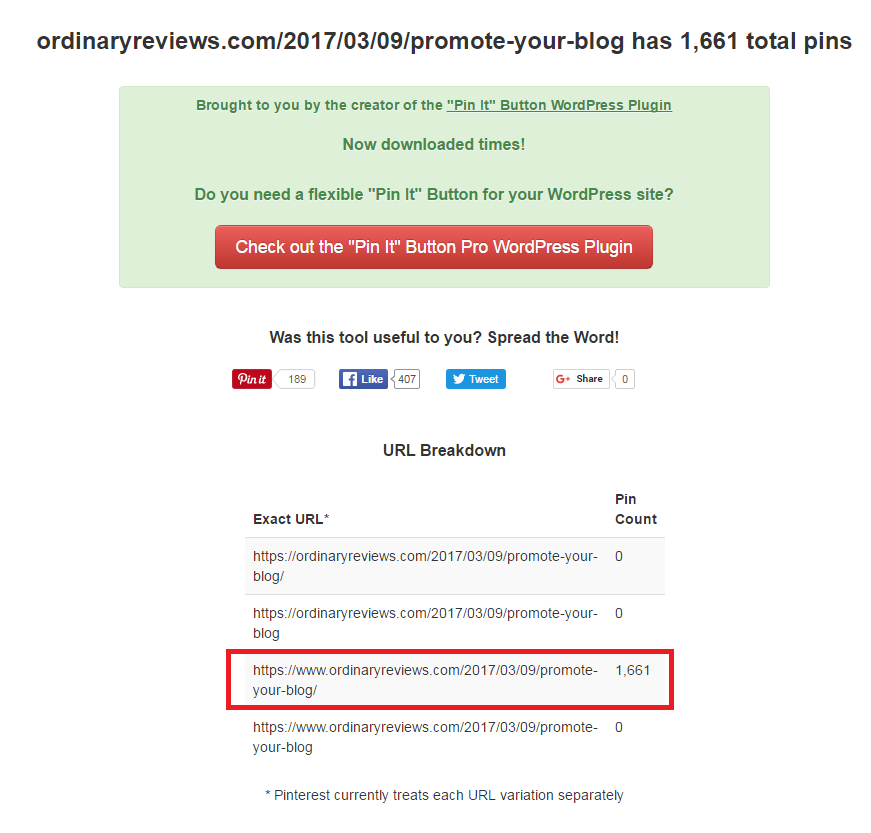
It may not be a lot of re-pins for some of you but it was pretty shocking for me. Most of my pins don’t even reach 100 re-pins!
What’s the method of getting your pin viral?
I don’t actually have a solution or method to make a pin go viral. No blogger (none that I know of) will be able to guarantee that a particular pin will go viral. Having said that, there are ways to increase the virality of your pins and good bloggers know how to.
Some of the following steps have helped me and it may help you as well.
Note: I’m in no way a Pinterest expert. I have very few followers yet it’s possible for a pin to go viral.
#1 Switch to a business account
No, you don’t need to pay to convert to a business account. I don’t remember the steps exactly on converting your account, but it was quite an easy process.
If I’m not mistaken, just head to your settings and you should be able to convert it.
Why move to a business account?
The main reason why I moved is because I can see the analytics behind how my pins are performing and whether my pinning strategy is working.
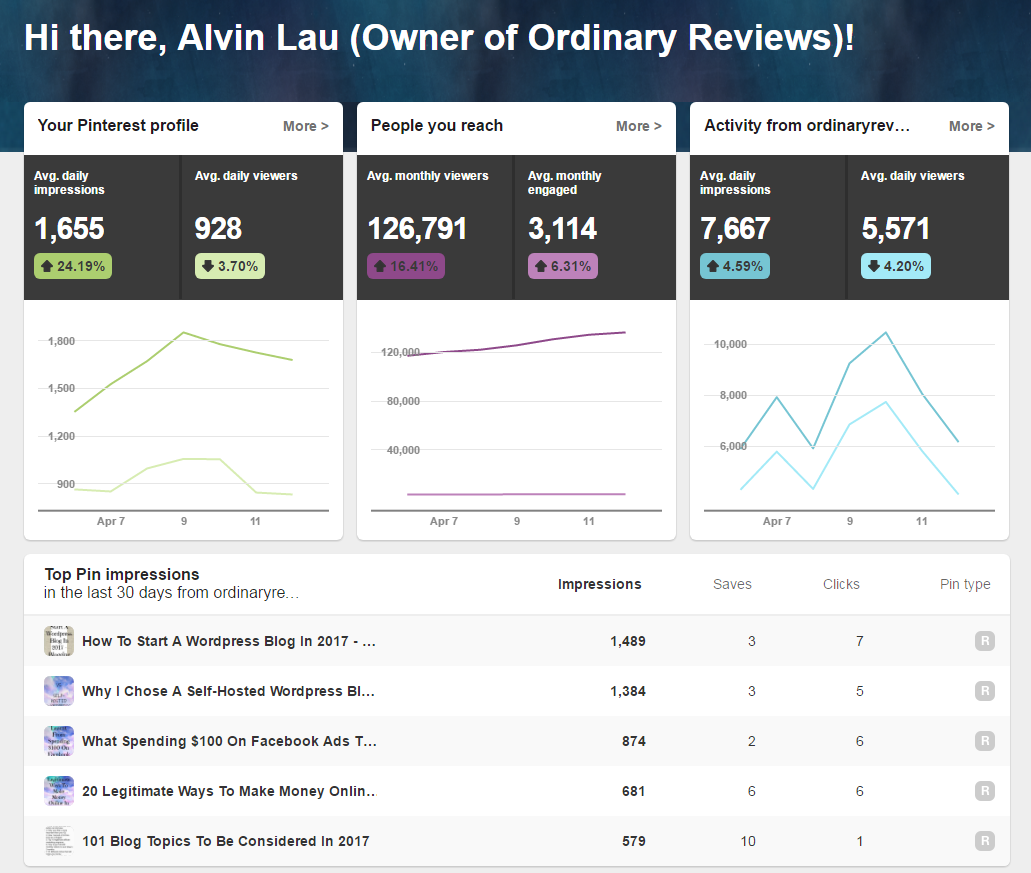
If you look at the image above, you can see three different sets of graphs. The first is your profile, i.e. how many people are viewing your profile on Pinterest.
The second is the number of users you reach and how many engaged with your pins. It includes pins from other users as well. The third refers to just your pins and how well they’re performing. You can see a huge dip in my own pins in terms of daily viewers and impressions. Even though my monthly reach is increasing, it doesn’t necessarily mean that more will be seeing your own pins.
It’s really useful as I’m trying different pinning strategies and this allows me to see what is working and what is not.
By the way, daily viewers doesn’t mean traffic to your blog. If you’re looking for traffic stats, the “clicks” you see at the bottom of the image shows you how many are actually viewing your site.
#2 Enable rich pins
What are rich pins?

If you look at the pins above, you can see that one has a title in bold. That’s a rich pin. The other is just a regular pin. When you have rich pins enabled and you upload your pin, it automatically syncs with your website and creates a pin with a bold title. That’s not the only feature.
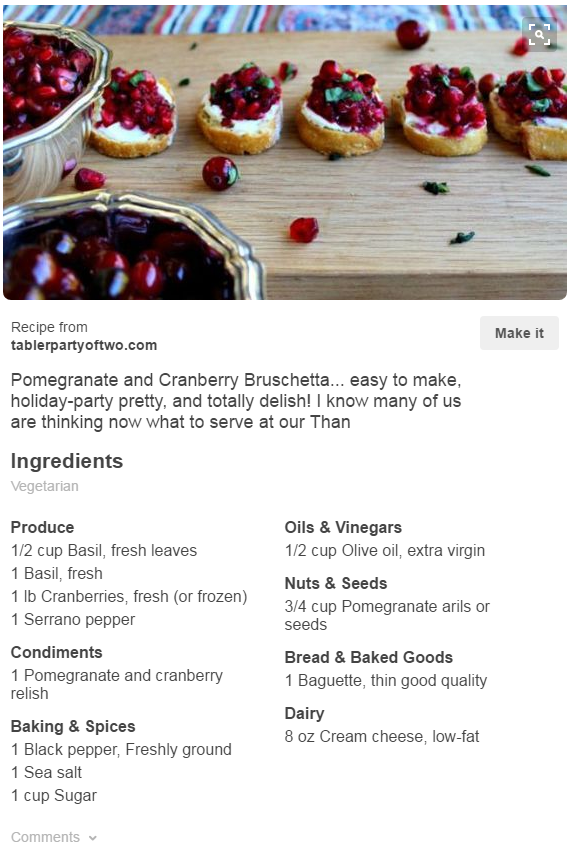
The power of rich pins is that it can even create descriptions like this! How cool is that? It not only makes your pin better, it results in more re-pins and followers!
#3 Create long beautiful pins
This is where I’m actually bad at. I would think that my pins now are rather “acceptable” but not great. It used to be worse though!
I use either Canva or PicMonkey to create beautiful pins. No worries, you can use them for free to create beautiful pins. If you want access to many more designs, then the paid option might be better for you.
Example of my pin:

It’s not brilliant but it’s much better than what I used to create. The optimum size of images is about 735 x 1104 pixels. You can create longer ones if you wish to post pins with infographics or tutorials.
Where do I find stock photos?
To get free stock photos, I normally use Pexels and they have all kinds of photos based on category. Pixabay is quite good as well.
#4 Create proper keywords for your pins
I would like to think that this is where I failed my Pinterest game in the beginning.
The funny thing is I didn’t know why this pin went viral while others didn’t. I watched a webinar by Melyssa Griffin and I realized that the keywords on my description were too long and not optimized properly.
My pin that went viral was the only one that had a description which mirrored the title. It might not have been the main factor towards virality, but I’m sure it has played a part. There was even a point in time where my pin would appear as the second pin at the top if I searched for “blog”. It was an amazing feeling as I’m still a Pinterest newbie!

If you look at the image, you will realize that the title and the description is the same. The trick is to optimize your keywords the same way you do SEO. Pinterest is a visual search engine after all!
If you wrote a post about affiliate marketing, you would want the keywords “affiliate marketing” to appear at the front. It helps to get your pin discovered by those who are manually searching for pins on “affiliate marketing”.
#5 Join group boards!
This tip is the number one tip for me when I started. Why? Because I had ZERO followers. Pinning continuously isn’t going to help me if I have no followers at all.
How do I find group boards?
The best place to find group boards is by using a directory like PinGroupie. You can use PinGroupie to search for all of the group boards in your targeted niche, and you can check how many pins, likes, collaborators, followers and repins a group board has.
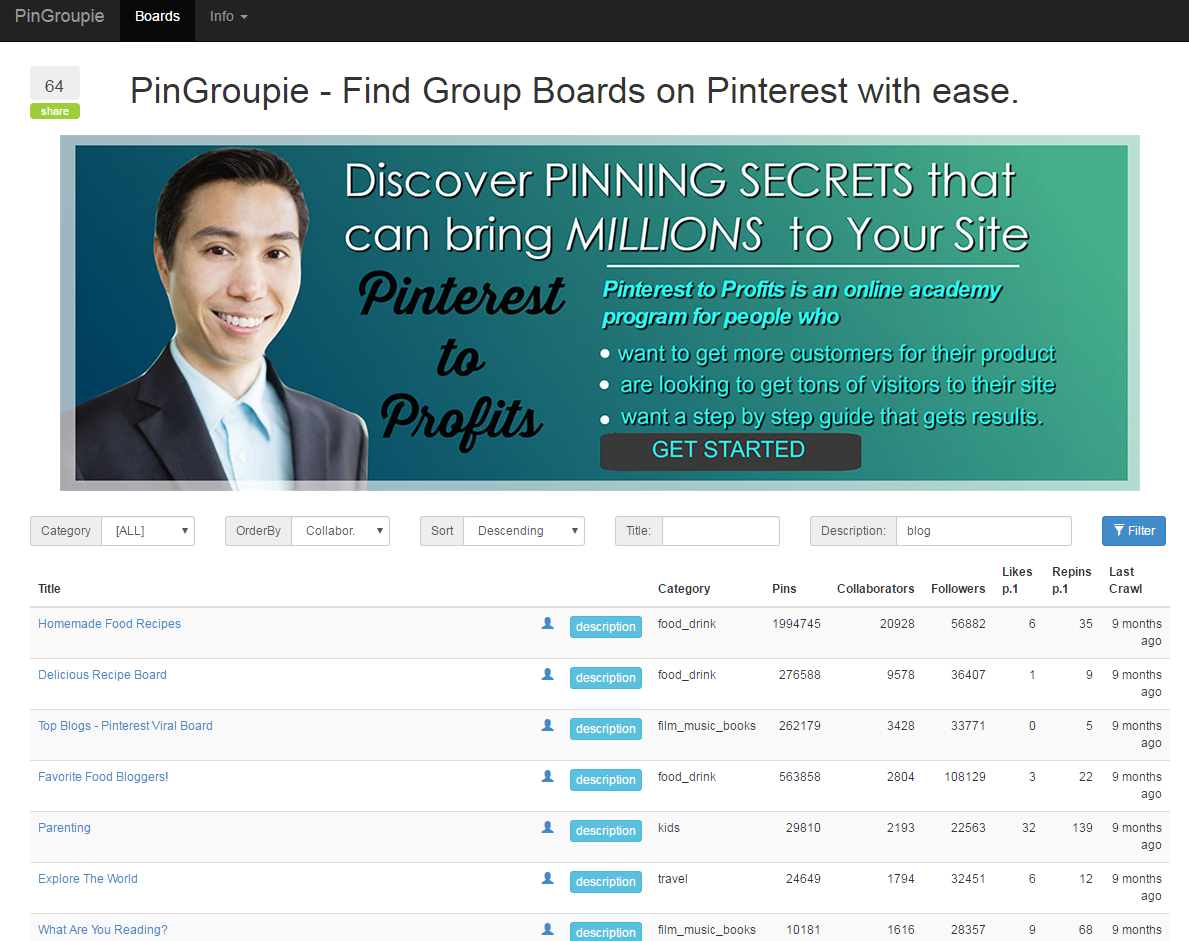
Now that you’ve identified which group boards are of use to you, how do you join as a contributor?
Unfortunately, Pinterest does not have an “apply” button yet. Hopefully they will implement one in the future. For now, it’s a bit of a hassle.
To join a group board, you will have to contact the owner of the board via email or by commenting on one of the person’s pins. Some group boards have their own rules to join or some are even closed to new pinners. They usually require that you follow their accounts. You have to keep trying to get invited to more group boards. That way, you can increase your repins.
#6 Invest in a Pinterest scheduling tool
First of all, a scheduling tool is not mandatory for you to be successful in Pinterest but it is recommended. Some prefer manual pinning and they have found success for themselves.
For me, I invested in Tailwind, a scheduling tool, for two main reasons:
- I live in a different time zone from most of the users on Pinterest. Hence, I need a scheduling tool to pin when I’m in bed and also at optimal times.
- It reduces my stress by a lot, as I can schedule my pins for the entire week or the month! I don’t have to use Pinterest every hour to keep pinning. It’s especially useful if you’re the type that pins a lot. Ever since using Tailwind, I can focus on growing my social media accounts and writing better content.
Tailwind also has a smart feed that determines when my pin has received the best engagements (repins / clicks). If I intend to pin 30 times a day, I just have to key in “30 times” a day and it determines the weekly schedule automatically.

If you can see in the background of the image, there are many time slots. That’s my schedule for now.
To be honest, I’m not sure how many times you should re-pin a day to receive the most re-pins and clicks. Some suggested 15 – 30 times a day. Others suggested 100 times or more! It varies between individuals. In one of Tailwind’s own articles, they did an experiment where your pin’s reach and engagement reduces if you pin above 50 times a day.
I used to pin about 40 times a day but I’ve just moved to 100 times a day. I’m not sure about the results yet as I’ve just changed my schedule like yesterday. I will curate a post if I find interesting results!
Another thing that absolutely increased my reach is Tailwind Tribes. What are Tribes? They are similar to group boards but it’s exclusively on Tailwind. It’s a different platform where members of the Tribe can share pins and also re-pin other members’ pins.
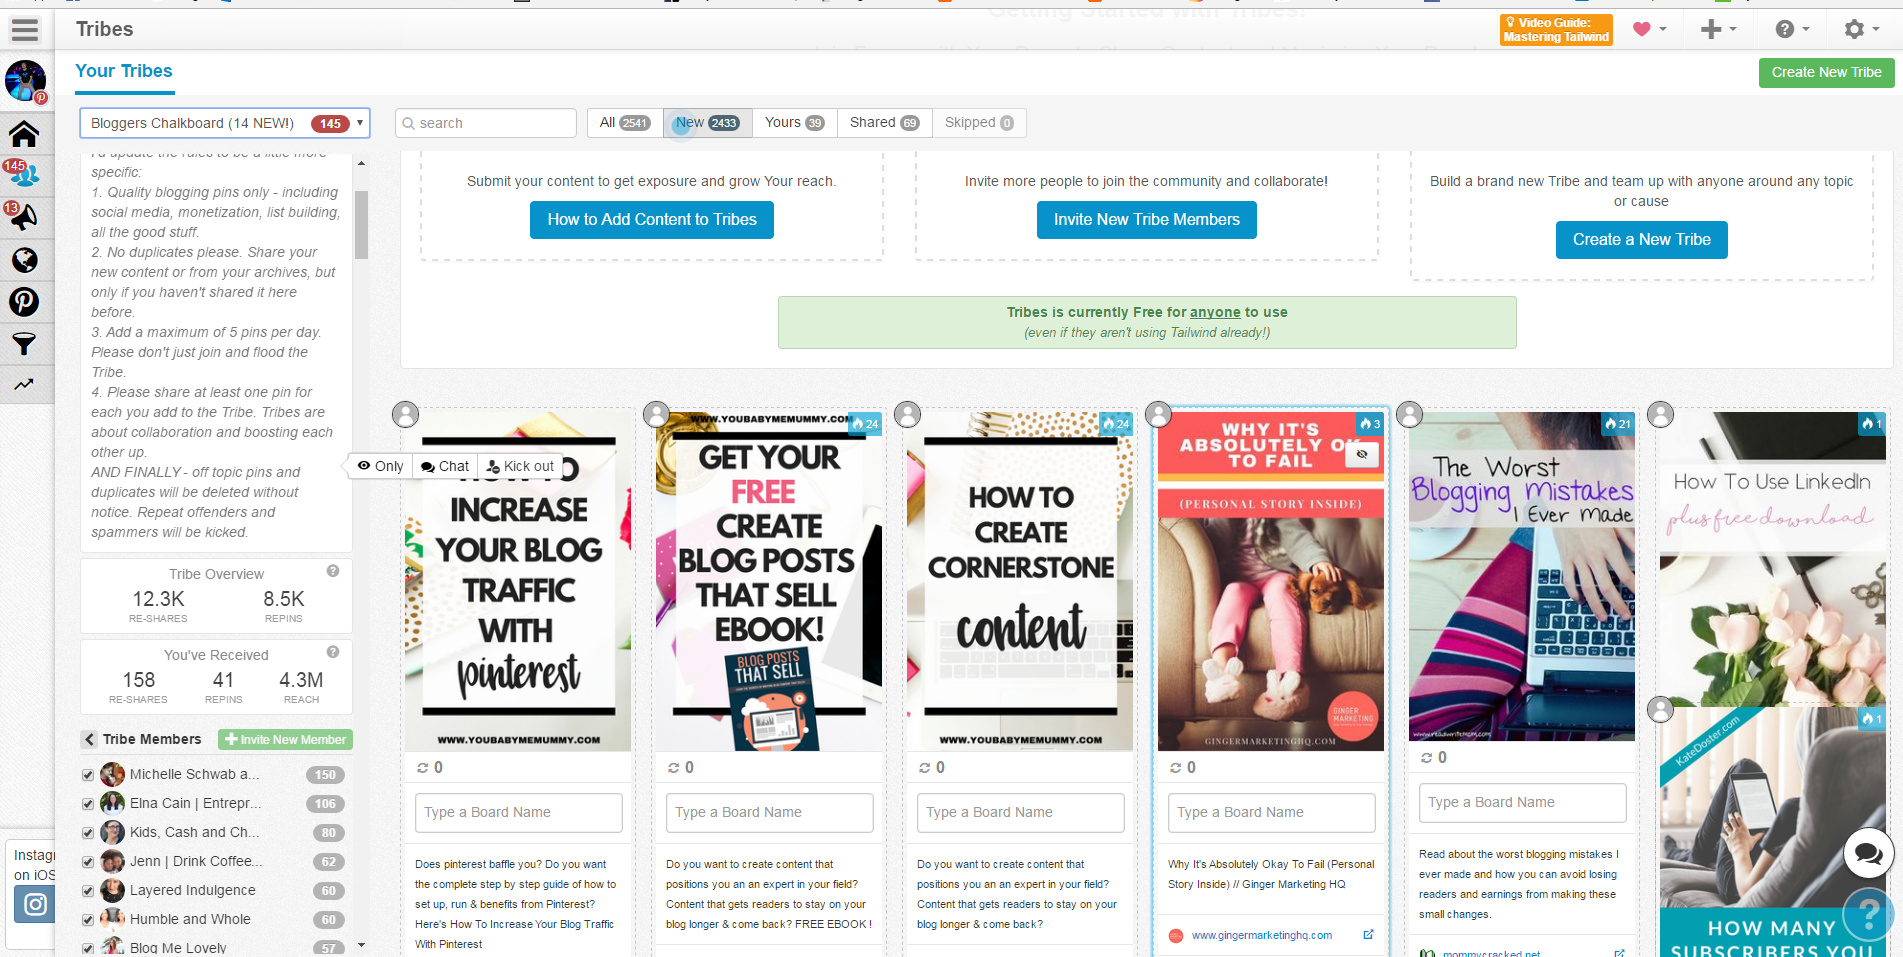
That’s how Tribes look. They are just like group boards but much more effective. Why? Because each Tribe has rules, for e.g. you have to share two pins from other members for each pin you shared in the Tribe. The ratio is usually “1 : 1” or “1 : 2”.
Furthermore, the Tribe owner can see how many of your own pins you have shared in the Tribe and how many pins belonging to other members you have shared to your own boards. You can be kicked out for non-compliance. That is why most people are obedient in sharing pins and it results in your pins getting re-pinned many times!
If you look at the left part of the image, you can see that I have received 158 re-shares which subsequently resulted in 41 re-pins and a 4.3 million reach for all of my pins shared in this particular Tribe. As someone who doesn’t even have 200 followers, this is crazy! That was probably how my pin went viral. This is only one Tribe. I’m in at least ten of these.
Note: In this scenario, re-shares are re-pins made by members of the Tribe. Re-pins are the number of re-pins which resulted from the re-shares.
Join Tailwind here and you will get a free $15 on your first month. Otherwise, you can start by signing-up for a free trial which allows you to pin 100 times a month. Furthermore, a free trial allows you to join Tribes as well.
By the way, I have created my own Tailwind Tribe and you can join even as a free trial member.
If you’re not interested in Tailwind, there are other tools as well, such as Buffer and BoardBooster. I’m using Boardbooster’s free trial for now and I’m not using it much so I’m not sure how good it is currently.
#7 You can re-pin more than once
If you re-pin to a group board only once, your pin may not reach many people. It’s okay to re-pin the same pin on a group board provided that the group board is huge.
In smaller group boards, there are normally rules that you should not pin the same thing more than once. If it’s a relatively quiet group board, I would avoid pinning the same pin more than once as it’s pretty obvious.
The best way to re-pin multiple times is to find group boards that have new pins every few seconds. It increases your reach and therefore increases the chance of your pin going viral.
#8 Don’t forget to re-pin other users’ pins
Last but not least, remember to re-pin not just your own content but others’ as well. Some suggested a ratio of 20% your own content and 80% content from others.
I don’t follow that ratio exactly. I tend to pin more of my own than content from others. You will know for yourself if you’re pinning too much of your own content.
Takeaway on how my pin went viral
There is no secret formula in how my pin went viral. I merely followed advice from experienced bloggers on what to do and not to do on Pinterest.
The steps suggested above are what I have implemented and it worked for me. My humble advice is that you have to follow all of the steps, not just pick a few out of them. It works best if you utilize all of the Pinterest tips that are available and it’s definitely more effective to do so.
If your pin hasn’t gone viral in the first few weeks, don’t worry about it. Some pins go viral months after it was pinned. Some of the pins that appear at the top were links to articles written in 2014!